ENG. RAMI KHALIL
  • Main Page
  • Vision
  • About Eng. Rami Khalil
  • Services
  • Projects
  • Art of Engineering
  • Publications
  • Courses
  • Library
  • Programs
  • Documents
  • Articles
  • Topics Archive
  • Lectures
  • Contributions
  • Contact Us

Profile Shifted Gears

16/11/2019

0 Comments

 
Picture
Avoiding an undercut with a standard gear (standard pressure angle of 20°) requires a minimum number of teeth of 17. If gears are nevertheless to be manufactured below the limit number of teeth (e.g. because a certain transmission ratio is to be achieved), the undercut must be avoided in another way. For this purpose, a so-called profile shift can be used.

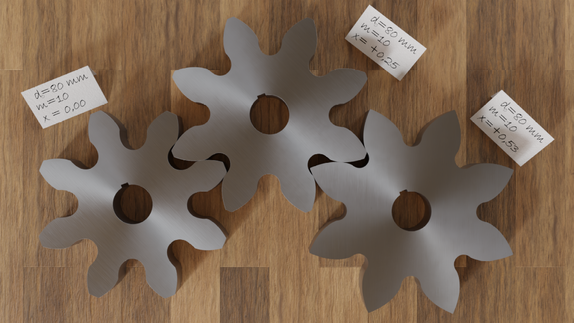
With a profile shift, the tool profile is shifted outwards by a certain amount during gear cutting. The animation below shows the effects of a profile shift on the tooth form of a gear with 8 teeth. It becomes clear that as the profile shift increases, the undercut becomes smaller and can even be completely avoided.

Even if the tooth shapes differ from each other, the teeth can still mesh with each other. Profile shifted gears (also called corrected gears) can therefore be easily paired with non-profile shifted gears (so-called standard gears) as long as they are manufactured with the same tool and therefore have the same module.

Even if this may not seem so at first glance, a profile shift has no influence on the shape of the tooth flank itself. All profile shifted gears use the same involute for the tooth shape compared to their corresponding standard gears. Only another part of the same involute is used. This becomes clear when the tooth flanks of the gears with different profile shifts are placed on top of each other.
Note that the base circle for constructing the involute is determined solely by the flank angle of the tool profile (standard pressure angle) during gear cutting. And since the angle of the cutting edges does not change with a profile shift, the base circle and thus the involute do not change either.

The radius of curvature of the involute increases with increasing length, i.e. the further away the involute is from the base circle, the larger the radius of curvature is and the less strongly it is therefore curved. The flank shape at this more distant area is rather “flat” than “pointed”. The smaller curvature leads to a larger contact surface of the flanks, which reduces the pressure accordingly (less Hertzian contact stress). This reduces the stress on the flanks and thus increases the flank load-bearing capacity.

The animation below shows the profile shift of a gear with 6 teeth to avoid an undercut. In this case, the thickness of the tip tooth even decreases so much that the involutes taper before the shifted tip diameter is reached. The increase of the tip circle radius by the amount of the profile shift cannot therefore be maintained in this case, the tip diameter is inevitably shortened.

In addition, the tip circle would have to be shortened again to at least 0.2 times the module in order to increase the thickness of the tip tooth. However, such a large reduction of the tip circle would also result in a correspondingly large reduction of the line of action. Involute gears with fewer than 7 teeth should therefore be avoided by any means.

With corrected gears, an extended part of the involute is used as tooth flank compared to standard gears. When meshing with another gear, this further curved part of the involute requires the center distance to be increased by the amount of the profile shift V= x⋅m.

In summary, it can be stated that a profile shift is always applied if:
​
  • An undercut is be avoided,
  • The tooth strength must be increased,
  • The surface pressure at the flanks is to be decreased, or
  • The center distance must be adjusted.


0 Comments

Non-Circular Gears

27/10/2018

1 Comment

 
Picture
When a machine must provide unusual displacement or speed characteristics, don’t overlook noncircular gears. These oddly-shaped gears can fulfill several types of special motion requirements, and one of them may be the best solution for your application.

Why thease gears?

Various mechanical systems, such as cams and linkages, can provide special motion requirements, but noncircular gears often represent a simpler, more compact, or more accurate solution.

Servo systems may also be able to do the job, and they can be programmed to handle changing or complex functional requirements. But they are usually more expensive. Also some companies lack the expertise to solve problems with servo systems. Moreover, noncircular gears do offer limited ability to handle changing functional requirements. For example, you may be able to change an output function by adjusting the phase relationship between two mating noncircular gears.
​
Some of the more common requirements handled by noncircular gears include converting a constant input speed into a variable output speed, and providing several different constant-speed segments during an operating cycle. Other applications require combined translation and rotation or stop-and-dwell motion. Here are a few examples that may stimulate some ideas about your own applications.

Variable speed
Several types of noncircular gears generate variable output speeds, particularly elliptical gears. Other, less commonly used types are triangular and square gears.

Elliptical: 

An ellipse is defined by a set of points such that the sum of the distances from two fixed points on its long axis to any point on the perimeter is a constant. This enables a set of like elliptical gears to run at a constant center distance but deliver an output speed that changes as they rotate. Elliptical gears come in two basic types: unilobe, which rotates about one of the fixed points, and bilobe, which rotates about the center. The speed-reduction (or increasing) ratio of these gears varies from 1/K to K, where K depends on the gear geometry, during each cycle of rotation. Practical values of K range up to 3 for a unilobe and up to 2 for a bilobe gear.

The largest radius of the driving gear mates with the smallest radius of the driven gear so that output speed is at its maximum. As the gears rotate, the radius of the driving gear gradually decreases and that of the driven gear increases, so speed decreases for the first ¼ revolution. Then the speed increases for the next ¼ revolution, etc. These periods of increasing or decreasing speed occur four times per revolution.
Elliptical gears are commonly used in packaging and conveyor applications.

Triangular:

A pair of triangular gears also converts constant input speed into alternating output speed. However, they have three lobes, or high points on the perimeter, rather than the two lobes in elliptical bilobe gears. As a result, triangular gears deliver six periods of speed increase or decrease per revolution, rather than four.

Square:

Gears that are square provide yet another way to produce varying output speed. These gears have four lobes, so they produce eight periods of speed increase or decrease per revolution.
Both triangular and square gears are limited to a smaller range of speed ratios than with elliptical gears.

Constant-speed segments

Where an application requires several constant-speed periods within a cycle, multispeed gears may be the answer. These gears make the transition between speeds by using special function segments on the gear perimeter, usually sinusoidal, between the constant-speed sections. Typically, the input and output gears are different.

Translation and rotation

For applications requiring both translational and rotational motion, certain gears serve as cam substitutes. These cam gears are often used in labeling machines. The cam gear duplicates the shape of a part to be labeled and a cam-following rack carries the labeling device at a constant surface speed. In welding applications, a cam gear simulates the shape of a part to be welded and a follower carries a welding torch at a constant speed to ensure uniform weld application.

Stop-and-dwell motion

Some machines must provide either stop-and-dwell, or reverse motion with a constant input speed. This is achieved by combining noncircular gears with round gears and a differential (epicyclic gear train). Using round gears with different ratios gives such an arrangement the flexibility of providing either stop-anddwell or reverse motion.

Stop-and-dwell motion is common in indexing mechanisms, where gears are used rather than cam or Geneva mechanisms. Reverse motion is required where a transfer device must operate between two locations. Here, a noncircular gear arrangement is usually simpler than a commonly used linkage assembly. Despite their flexibility, such arrangements tend to be expensive.

Typical applications

These examples show how noncircular gears solve manufacturing problems.

Sealing head: 

A heat-sealing device seals the tops of containers on a constant- speed conveyor. It must maintain contact for a short period of time (less than 1 sec) without slippage between the sealing head and container. A traditional approach is to install an indexing device that stops the conveyor while sealing occurs. Or, if the conveyor can’t be stopped, a cam and linkage device or electronic servo is used.

A simple solution involves mounting the sealing head on a crank mechanism driven by elliptical gears which let the head stay in contact with the container momentarily. A varying output speed provided by the gears lets the sealing head follow the container without slippage and then return for the next container.

Rotary cutoff knife: 

A rotary knife cuts material on a conveyor to different lengths while the conveyor runs at a fixed speed. To cut material of different lengths without changing the conveyor speed would require using different knife sizes (diameters) and changing the knife speed.

One solution is to drive the knife with elliptical or multispeed gears. Changing the input gear speed with respect to conveyor speed changes the length of material that is cut. Adjusting the phasing between gears relative to the cutoff point causes the knife to match the conveyor speed.
1 Comment

Multi-Axis Sensors - Frequently Asked Questions:

26/5/2016

0 Comments

 
PictureMulti-Axis Sensor
Q: What is a multi-axis sensor? 
A: A multi-axis sensor is one that can measure forces happening in more than one plane as, for example, measurements in the x and y directions. Some multi-axis sensors can measure not just directional forces but also moments, rotational forces about an axis.

Q: How many axes can multi-axis sensors typically measure? 
A: Multi-axis sensors can measure up to six axes. A six-axis device would measure x, y, z directions and moments.
Q: What applications measure forces in more than one planner direction? 
A: Many such applications try to determine a vector load that must be described in terms of x, y, and z positional coordinates. Similarly, multi-axis sensors help resolve a direction or gauge inputs in multiple directions.

Q: What types of outputs can be expected? 
A: Depending on the application and the magnitude of the force, typical outputs are in units of mV/V analog or they are converted to a digital output that follows a standard protocol such as FireWire or CANbus. The mV/V electrical output refers to sensor excitation at the rated load, torque or pressure. For example, the voltage output of a 2 mV/V load cell at 100 lb-rated capacity using 10-V excitation will be 20 mV at 100 lb or 0.2 mV for each pound of applied load.

Q: When do we use multi-axis sensors instead of multiple single-axis sensors? 
A: A multi-axis sensor can be smaller, and occupy a smaller space envelope than multiple single-axis sensors. Moreover, its connection scheme can be simpler as well. These factors tend to reduce material costs.

Q: What choices are there in term of size and capacities? 
A: It is possible to find multi-axis sensors able to detect loads of only a few grams. It is also possible to find units that can respond to loads of several thousand pounds without being crushed.

Q: What is crosstalk in multi-axis sensors? 
A: When a load is applied in only one direction and there is an output in the other axes, there is said to be crosstalk between the channels. Crosstalk levels are part of the technical specs for multi-axis sensors. They are given as a percent of the channel output. Crosstalk interdependencies among force and moment axes can be compensated mathematically.

Q: How is nonlinearity defined for multi-axis sensors? 
A: Nonlinearity is the maximum deviation of the calibration curve from a straight line drawn between the no-load and rated load outputs, expressed as a percentage of the rated output and measured with an increasing load.

Q: What is multi-axis sensor hysteresis? 
A: Hysteresis is the maximum difference between the transducer output readings for the same applied load. One reading comes from increasing the load from zero and the other from dropping the load from the rated output. Hysteresis is usually measured at half the rated output and expressed in percent of rated output.

Q: How are multi-axis sensors mounted? 
A: Because multi-axis sensors measure both moments and forces, they are sensitive to being at even a slight angle to the mounting surface. So mounting procedures must prevent even slight misalignments. Mounting surfaces must be rigid enough so that they do not warp. The general rule is that the thickness of the connection elements should be about one-third that of the transducer height. (It’s best if the contact surface deflects less than 0.005 mm under load.) The surface must also be paint-free and made of steel with a minimum hardness of 40 HRC. The stainless steel measuring body (mechanical interface) of the transducer has a minimum hardness of 42 HRC. Surface flatness should be better than 0.05 mm and surface roughness ≤ Ra 1.6. Ideally, the surface should be ground. The transducer should be centered on the structural elements and aligned using positioning pins. The angle error or the positioning tolerance should be kept below 0.1°. Finally, multi-axis sensor mounting screws should be tightened down diagonally in sequence up to the full tightening torque to keep the sensor lying flat on the mounting surface.

0 Comments

Topology Optimization:

22/12/2015

0 Comments

 
Picture
Product cost is one of the prominent factors that manufacturers strive to reduce through evaluating number of design alternatives. It is for this reason why simulation tools are being extensively exploited, so that conventional design can be altered to an extent where products can be developed competitively in terms of price and quality.

As such, topology optimization is being increasingly applied through finite element analysis by most of the manufacturers today, helping them in developing lighter and stronger products. While the major cost function in any product is its mass due to the amount of material invested, topology optimization as a part of product design optimization for manufacturers helps them in achieving better design alternatives, requiring less material that reduces weight and allows manufacturers a room to price the product more competitively.

However, topology optimization when not applied correctly can lead to a drastic failure of the design and can hamper the brand value of the organization. It is therefore a tool that requires a broad understanding of the constraints and load cases that would affect the product design and development. Failing to consider even a single constraint can cause the design to fail and mess up all the cost optimization goals, which were actually set to meet market requirements.

Factors to Consider While Performing Topology Optimization:

To perform topology optimization, it is important to figure out design variables and constraints for the product under consideration. Also, the cost function is required to be defined to optimize the structure and figure out how good the design is.

Cost function could be reducing the mass, improving stiffness or maximizing stress resistance. However, reducing the cost function requires also the identification of design variables from where the reduction can be achieved. It could be possible to achieve optimized structure design by reducing its thickness, length or other design variable. These variables however are defined considering the constraints that put a limit on the extent to which the variable can be optimized. An example could be maximum stress and strain limits a structure or material can withstand.

Failing to realize any variable or constraint can lead to an under designed product that would fail prematurely. It is the reason why majority of the designers prefer not to use topology optimization. However, when done properly, it could reduce the cost to a significant level.

Executing Topology Optimization:

Topology optimization through finite element solvers is usually performed using gradient based algorithms that calculate the local minimum (a value beyond which the design will be invalid) at each element.

To perform the simulation run, following process is usually followed:
  • Select the most sensible cost function such as Mass of the structure, which is most usually the choice in optimization.
  • Figure out the variables that software is allowed to change and maximum limit of the change.
  • Find out all the possible ways for the structure to fail, i.e. ways through which the requirement of the design is not met.
  • Create different load cases for failure modes (e.g. static load, buckling load, etc.)
  • Define the constraints for each load case to specify when the structure will not be considered as valid. (e.g. high stresses or low factor of safety)
  • Define the maximum number of allowable cycles and maximum change allowed per cycle.

The optimization solver can then be initiated to solve the equations through finite element approach and results can be visualized. The basic topology results however are not clear as it erodes the material envelope to find the stiffest shape for all the load cases. Thus, the structure design can be improved using the eroded shape as a guide to develop a smooth geometry.

The finalized design should again be simulated and change in the variables should be compared to the previous shape. If the result is unacceptable, the load cases are required to be redefined and the procedure has to be repeated until the variable values are within the permissible range.

The topology optimization approach can be utilized to build highly economical products without much effort. Lighter and stronger products mean lower development costs for manufacturers and better acceptance rate from the consumer.

Applications of topology optimization are many, it is however important to know the sensitivity of the approach that requires considering all the design variables and constraints to avoid catastrophic failure.
0 Comments

How trustworthy are the results obtained through Finite Element Analysis - FEA?

19/12/2015

2 Comments

 
PictureExample of FEA Resuts
​Finite element analysis has always been used as a third dimension in product testing apart from experimental and analytical tests. The reason why FEA alone is not employed as a standard testing tool is primarily because it is an approximation of the partial differential equations and often consists of residuals that always keep the results from being 100% accurate.

However, FEA cannot be neglected as it helps in achieving comprehensive product behavior under loading even for complex geometries for which approximations are better than knowing nothing. The validity of FEA results however is purely a judgment that is based on the knowledge of the analyst performing the simulation. It is purely his expertise and accurate application of boundary conditions with required assumptions that yields a meaningful result through FEA approach.

Any FEA solver or a software package available today incorporates number of functions and variables which include force, mass, velocity, acceleration, heat flux, stress-strain, displacement and other dynamic loads, with each load case requiring a separate analysis.

However, modern simulation tools have become much easier allowing non-experts to easily model the problem. The results obtained however are required to be justified. An inexperienced engineer might consider the results valid whereas an experienced analyst might consider adding few more elements across critical regions of the geometry and refine the results further.

While FEA helps in reducing number of prototyping trials and manual calculations, the results are still required to be verified with a physical experiment to ensure the solvers reliability. It is quite easy to build a neat and colorful FEA model through several computational iterations but with no meaningful value. It is always good to perform simple hand calculations in the beginning before going for a simulation run.

Later, when the FEA results show dramatic increase in the values, it can be easily identified that something is wrong with the simulation or the boundary conditions might not have been defined properly.

Regions with complex geometry such as edges, chamfers, holes or curves can be easily neglected by an inexperienced engineer. An expert would rather consider the ones critical to the design aspect and apply fine mesh on those regions to ensure that the physics are captured accurately.

It is also crucial to carry out mesh sensitivity analysis by performing same FEA load case with different mesh quality and element types to realize that the solution has the potential to give accurate results without further mesh refinement required.

When in the right hands, FEA can save months in the product design and development stage by providing required information early. Prototyping trials can be reduced considerably with a subsequent reduction in development costs.

However, it is important to realize that the tool will only be as good as the operator using it. It is thus the ability and experience of the analyst that decides the quality of FEA results and not the expensiveness of the software package that promises accuracy.

2 Comments
<<Previous
    Picture

    Eng. Rami Khalil

    Mechanical Design and Production Engineer.

    Archives

    November 2019
    May 2019
    November 2018
    October 2018
    May 2016
    January 2016
    December 2015
    November 2015
    February 2014
    January 2014

    Categories

    All
    Addictive Manufacturing
    Additive Manufacturing Standardization
    Automation Control
    Machine Design
    Manufacturing Processes
    Material Science
    Product Design And Development
    Robotics
    WaterJet Technology

    Facebook:

    Youtube:

    RSS Feed

Services

  • CNC Machine Design
  • Robotic System Design
  • Mechanical Design Services

Eng. Rami Khalil

  • About
  • Vision

Menu

  • Projects
  • Publications
  • Courses
  • Library
  • Programs
  • Documents
  • Articles
  • Topics Archive
  • Lectures
  • ​Contributions

Support

  • Contact Us
  • ​Terms of Use

SOCIAL Media

Facebook
Youtube
COPYRIGHT ©  2025 ENG. RAMI KHLIL.  ALL RIGHTS RESERVED.